Good food, drinks, friends and ukulele!!!

Tag: BBQ

Grilled Slaw Is A Thing


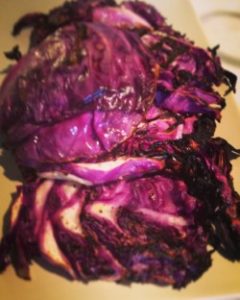
Spring is here and the grill is out!!!  I was recently at my friends apartment that I spend a good amount of time at.  We BBQ a lot in the warm months of the year and are always trying new things on the grill.  Last weekend we grilled cabbage to make a grilled coleslaw.  It was tremendous!!!   But as most of you know I will through anything on the grill.  Grilled celery anyone?  Don’t knock it till you try it.   I’m sure there a lot’s of people who feel the same way I do about grilling everything and anything.  So I am sure you will have no problem with this warm version of slaw.  We used only red cabbage instead of the usual red and green.  I cut the red cabbage lengthwise, about 1/4 – 1/2 inch slices, with the core to keep the slices intact.  I left the carrots whole, peeled and cut the onion into rings.  When everything was done I did a rough chop of the veggies, giving them a rustic feel.  When grilling just use a small amount of olive oil on the cabbage.  This makes it so you won’t have to use a lot of mayo, which is usually essential in a good slaw.  We used a garlic mayo and minced capers for our dressing.  You could also leave out the capers, squeeze a lime and chop some cilantro with the garlic mayo for a different version.  Even add a little red pepper flakes for some heat.  Or whatever your heart desires.  I find grilling things opens my creative mind to different ways of preparing and eating food.  I hope this inspires you to explore and start grilling in different ways!!!


Grill Slaw Is A Thing
Author: 
Prep time: 
Cook time: 
Total time: 
 
This is a great way to have a healthier side dish but keeping a bbq staple that everyone loves.
Ingredients
  • 1 Head red cabbage
  • 1 Onion - white, yellow or red
  • 2-3 Large carrots
  • 2-3 Tbsp of Garlic Mayo
  • A Handful of Capers
  • Olive oil
  • Salt and pepper to taste
Instructions
  1. Cut cabbage length wise and keep core intact about ¼-1/2 inch thick.
  2. Peel and slice onion into rings.
  3. Wash carrots thoroughly, and dry them.
  4. Lightly coat onions, carrots and cabbage with olive oil, salt and pepper.
  5. Carrots take a little while so start them first.
  6. Grill veggies till desired doneness.
  7. I usually only flip the onions and cabbage once during grilling.
  8. Gives them a nice grilled sear marks.
  9. While veggies are cooking mince the capers.
  10. When done, cut core out of cabbage and trough away.
  11. Then give a rough chop to all veggies.
  12. I still like to cut the carrots in strings but am not so precise with the chopping.
  13. Toss with mayo and capers.
  14. Salt and pepper to taste.
Notes
The grilling time is approximate. It all depends on your grill and how cooked you want the veggies.

How Leftovers Become Stars.

images


I love taking leftovers and reworking them into something else.  Fried chicken into chicken salad, symptoms roasted veggies into soup, order tortilla chips and salsa into chilaquiles con huevos and the list goes on.   I learned this from my father who would take the previous nights dinner and make it part of breakfast.  It was completely common to have spaghetti and eggs or enchiladas and eggs in the morning.  I have taken that one step further and turn leftovers not only into breakfast but lunch or dinner.  I know a lot of people do this especially if your a parent or a chef.  I find it to be a fun challenge and really get into it.  You may recall a posting where everything was round.  All leftovers.  If I’ve made you brunch or you’ve come over to a bbq, cure there is a good chance some part of it was a leftover.  My latest is was very simple.  Curried corn that had previously been grilled con on the cob.  I just cut the corn off the cob added curry powder, lime juice, red onion, a seeded jalapeno, salt, pepper and some melted butter.  Simple, easy and a crowd pleaser.

Ceviche 3 Ways

Ceviche 3 ways
Recipe type: Appetizer
Prep time: 
Cook time: 
Total time: 
Serves: 4
 
Ingredients
  • 1 lb. of fresh white fish (Tilapia, dosage Basa)
  • 2-3 juiced lemons or lime
  • half a red bell pepper
  • half a yellow or orange bell pepper
  • half a small onion (red or yellow)
  • ¼ cup chopped Cilantro
  • Version 2
  • 1 can of coconut milk.
  • Version 3
  • 1 freshly grated coconut
Instructions
  1. Make sure the fish is as fresh as you can get. It really makes a difference.
  2. Juice citrus( I prefer lime)
  3. Chop fish into small bite size pieces
  4. In a bowl add fish and juice
  5. Cover with plastic wrap or put in a zip lock bag, healing
  6. Chill in fridge for at least and hour or more. The longer the better.
  7. Chop onion and peppers into small pieces, set aside
  8. Chop up cilantro and set aside
  9. When fish is done combine with veggies, cilantro in serving bowl
  10. Serve immediately
  11. *Version 2
  12. When fish is done rinse in a colander and put in serving bowl
  13. Add veggies and cilantro
  14. Add coconut milk, stir and serve.
  15. *Version 3
  16. When fish is done rinse in a colander and put in serving bowl
  17. Add veggies and cilantro
  18. Grate coconut and use a piece of cheesecloth to squeeze out the milk
  19. Add coconut milk to fish and veggies
  20. Serve immediately
Notes
The measurements are approximate. Make sure there is enough liquid(juice) to cook the fish. I like to use a zip lock bag so the juice gets everywhere, and put it on a flat surface in the fridge. Halfway through the marinating process turn the bag over or if using a bowl, stir it at least once. Also when we were in Fiji the chef told us that when they don't have citrus they use white wine vinegar. We haven't tried it but if your going to, rinse the fish off after and use coconut milk.


Coconut Ceviche

Spring is here, although it took a while, we are seeing the signs everywhere.  People are out and about.  Eating on the sidewalks, lounging in parks, riding bikes and doing anything they can to be out in the world.  We here at Houseofzeta.com have been prepping in our own way. We have made a few batches of beer over winter,  collected some recipes to try out and put the up the BBQ.  We made our annual trek to D.C. for the Blossom festival, planted new flowers, signed up for the bike share and put away our winter clothes.  It is time to start fresh and get ready for summer!!!  Here is a quick easy recipe, that we have made many times and is a staple at our rooftop bbq’s, but now with a South Island twist that we learned when we were in Auckland and Fiji.  So enjoy and make it all summer!  Your guest will love it and never get tired of it!

© 2024 House of Zeta

Theme by Anders NorenUp ↑