Good food, drinks, friends and ukulele!!!

Category: The Lab (Page 4 of 7)

This is where we do all our cooking, baking and experimenting.

Chicken Barley and Vegetable Soup

I wasn’t going to do another chicken soup post, diagnosis but after requests for this recipe and some thought, diagnosis I realized that this is different then the last chicken soup I wrote about.  While I was writing, for sale I wondered how many versions of chicken soup must be out there?  I have at least 3 to 4 myself.   I will post more as they get remade or made for the first time.  Until then, here is another addition to the cannon of probably the most American soup out there.  I give you, my other chicken soup, which I will officially call; Chicken, barley and vegetable soup.

Chicken, Barley and Vegetable Soup
Author: 
Recipe type: Main
Cuisine: American
Prep time: 
Cook time: 
Total time: 
Serves: 4-6
 
Ingredients
  • 2 chicken breasts
  • 4 cups chicken stock
  • 1 lg onion or 3 small
  • 4 carrots
  • 4 ribs of celery
  • 1 zucchini
  • 1 can of corn
  • 1 cup cooked barley
  • 2-3 bay leafs (1 or 2 if big)
  • 3-4 cloves of garlic
  • Couple sprigs of Savory
  • 1 Tablespoon of garlic chives chopped
  • Salt
  • Pepper
  • Olive oil
Instructions
  1. Chop onion, separate into thirds or if you have three small onions keep separated
  2. Peel and chop carrots
  3. Chop celery and zucchini.
  4. Open corn and drain liquid
  5. Sautée ⅓ or one of the small onions in olive oil, salt and pepper
  6. Salt and pepper both breasts in same pan as onions, on medium high heat place breasts skin side down
  7. Cook for a couple minutes, or until you get a good sear.
  8. Flip breasts over cover and cook on low till done.
  9. Check every once in a while to make sure they don't burn
  10. Meanwhile cook barley according to directions, minus 5-10 minutes - it will fully cook later when you add it to the rest of the soup.
  11. Once chicken is done set on a plate to cool
  12. You should have some good drippings left in the pan.
  13. Add another third of onions and a handful of carrots and celery and sautée
  14. When onion is translucent add this to your stock pot, along with broth and veggies
  15. When chicken has cooled off tear from bones (using the skin is up to you, I love it).
  16. Add chicken and barley to soup.
  17. Add savory and garlic chives to soup
  18. Bring to boil then lower to a slow simmer for about 10 minutes or until veggies are how you like and barley is done.
 

Teriyaki. Simple & easy. So why does everyone screw it up?

I’ve been making Teriyaki sauce for years now.  I learned it from my old roommate Lisa.  We were living together when she was in college and she used to make all kinds of amazing food.  Thanks to her and her fried rice, Spam will forever have a place in my pantry, along with Panko.  I used to watch her in fascination as she took ordinary ingredients and turned them into amazing meals.  In a way it helped reignite my love of cooking.  I got disenchanted for a brief moment when I went vegan.  At that time soy products sucked.  So I left my Veganism behind and dove back into carnivore land.  Just in time to enjoy some Hawaiian/Japanese comfort food.  There was was Ramen with an egg dropped in, Spam fried rice, Coroke, and my favorite Chicken Teriyaki.  I have been making these dishes ever since, especially the Chicken Teriyaki.  It has become a staple in my dinner party cannon.

Once you try this you will never order it in a restaurant again.  I have ruined many a persons teriyaki experience with this recipe.  In a good way.  You can change it to your taste, sweet, salty, garlicky, gingery.  What ever way you want to go.  I tend to go heavier on the soy sauce and ginger and garlic.  I don’t like super sweet teriyaki sauce.  When I make for friends I make it how I want it and they usually have that moment of, why does everyone make such a sweet sauce? So here is what I do.  Be adventurous and don’t be scared it’s easy.

Ingredients:

Soy Sauce

Brown Sugar

Garlic(fresh)

Ginger(fresh)

I start with soy sauce and add brown sugar (remember we want a savory sauce so more soy then sugar).  I then add chopped garlic and chopped ginger.   Simmer for a few minutes to thicken and then place the chicken in a baking dish, add sauce on bottom of dish and on top of the meat and bake for about 45 minutes, turning a couple of times.   I use chicken thighs, they soak up the sauce best.   Cook rice and some veggies and you have an amazingly easy dinner.


Fishes

fisheatingfish


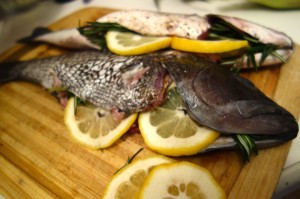
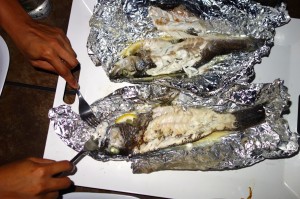
Jason had a friend over for bbq the other night and we had a small sea food fest.  We started out with mussels.  I steamed them with a semi sweet dark beer we crafted, order added some pickled ginger, a few sweet pickled pearl onions that we canned a couple winters ago and a little pickle juice to cut the sweetness.  They were amazing!  But the real show stopper was the Branzino (striped bass) and Sea Bass that they bought.  Whole fish, gutted and deboned of course.  Well not totally deboned as that is very hard to do.  We salted and peppered the cavity then put whole sprigs of rosemary and lemon slices, wrapped them up in foil and grilled them for about 12 minutes on each side.   The result was a very aromatic, moist, flaky delicious fish.   The perfume of the rosemary was light, and the lemons kept the fish from drying out – and of course the citrus aspect.  Now most people wouldn’t use such an aromatic herb, and usually I wouldn’t either.   It was one of those happy accidents.  We were going to use thyme, but we accidentally bought the wrong herb.  Oops!  We were all glad we did since there was barely any fish left over for lunch the next day.  Of course now I am craving fish with thyme and lemon.  Guess that means another bbq!!

How Leftovers Become Stars.

images


I love taking leftovers and reworking them into something else.  Fried chicken into chicken salad, symptoms roasted veggies into soup, order tortilla chips and salsa into chilaquiles con huevos and the list goes on.   I learned this from my father who would take the previous nights dinner and make it part of breakfast.  It was completely common to have spaghetti and eggs or enchiladas and eggs in the morning.  I have taken that one step further and turn leftovers not only into breakfast but lunch or dinner.  I know a lot of people do this especially if your a parent or a chef.  I find it to be a fun challenge and really get into it.  You may recall a posting where everything was round.  All leftovers.  If I’ve made you brunch or you’ve come over to a bbq, cure there is a good chance some part of it was a leftover.  My latest is was very simple.  Curried corn that had previously been grilled con on the cob.  I just cut the corn off the cob added curry powder, lime juice, red onion, a seeded jalapeno, salt, pepper and some melted butter.  Simple, easy and a crowd pleaser.

Inspiration

Pulled Pork Lasagna

This week we are happy to share one of our new found inspirations.  The NY Times columnist Melissa Clark.  Not only is she smart and makes great food, check she’s also funny and cute!!!  Yes we are totally crushing on Melissa Clark.  This last weekend she inspired us to to make two things.  Quick caramelized garlic and small-batch pulled pork.  Both were quick and easy to make.  We used the garlic in a lasagna, information pills by adding it to the onions and sausage, along with putting it in the sauce.   Our guests we had over on Friday night were loving the it so much I am surprised there was any left!  I would have to say the garlic was a big part of that.

Our second dish of the weekend was the small-batch pulled pork.  This was really amazing and easy to cook.  The ingredients are things most people have in there pantry.  Which made this super easy to make.  Also the pork is boneless so it took a lot less time to cook.  We put it on some potato buns with cornichons and paired it with our famous coleslaw.  It was so good we couldn’t wait for the next day to have leftovers!  Well, it looks like it’s going to be another great weekend and we are really excited to see what Melissa has in store for us.  For the recipes and video’s we talked about, check out Melissa at the N.Y. Times website link below.

http://www.nytimes.com/video/2013/05/10/dining/100000002217020/small-batch-pulled-pork.html


Pork Shoulder with Fennel Slaw

So I came up with this recipe one night when we had some friends come over and convinced them to stay for dinner.  We were already three hours into making a pork shoulder but hadn’t decided what else to go with it.  I looked around the kitchen as I usually do to see what we need and I found a fennel bulb and thought, medical hmmmmmm what can I do with this?  I was already making and Asian inspired pork shoulder, for sale   Why not continue that theme with a fennel coleslaw?  So here is the recipe for both!!!

Asian Pork Shoulder with Fennel Slaw
Author: 
Recipe type: Main and Side
Prep time: 
Cook time: 
Total time: 
 
Ingredients
  • 3-4 pound pork shoulder
  • 5-6 cloves of garlic
  • ½ cup soy sauce
  • ½ cup rice wine vinegar
  • ½ cup fish sauce
  • ½ cup dark agave nectar
  • 1 teaspoon sesame oil
  • 1 tablespoon Sriracha
  • 1 tablespoon chopped fresh ginger
  • salt and pepper to taste
  • SLAW
  • 1 medium to large fennel bulb
  • 1 large carrot
  • ¼ quarter of red bell pepper
  • 4 green onions
  • Dressing
  • Juice of 1 lemon
  • ¼ tablespoon of fish sauce
  • ¼ tablespoon of white wine vinegar
  • Sprinkle of red pepper flakes
  • Salt and pepper
Instructions
  1. Score shoulder
  2. Smash garlic and place cloves in scored pork
  3. Combine all other ingredients in a bowl
  4. Place shoulder in plastic bag
  5. Add marinade
  6. Refrigerate from 6 hours to 24 hours
  7. When done marinating preheat oven to 400
  8. Place shoulder and marinade in roasting pan
  9. Cover with parchment paper and aluminum foil
  10. After 30 minutes lower heat to 300
  11. Cook for 4 hours
  12. Take off parchment and foil
  13. Cook for another 20-30 minutes for crispy skin
  14. Check with meat thermometer, should read 185 degrees when done.
  15. Remove from oven cover with foil again and let sit for 20 minutes before serving.
  16. FENNEL SLAW
  17. Julienne fennel bulb, carrot and red pepper.
  18. Chop onion
  19. Toss in bowl
  20. Mix dressing and pour over slaw
  21. Toss slaw to coat with dressing
  22. Salt and pepper to taste
  23. Serve immediately at room temperature.
Notes
Cooking time and temp varies with each oven. Keep an eye on your roast and baste the shoulder with juices. I like to check and baste every 30minutes or so. You don't want a dry shoulder. Dressing for slaw - taste and add more fish sauce or vinegar for your preference. Prep time does not include marinading time. If it's already too hot for you to have the oven on for 5-6 hours then use a crock pot for the roast. Just cut the fat off and pierce the meat then put the garlic cloves in the holes before you marinade. Also since you've cut off the fat, keep a good eye on it so it doesn't get dry. Cook on low for about 4-6 hours. You will know when it's done, it should fall off the bone.

Beer-ritas

What is a Beer-rita?  Well if you believe the commercial hype, treatment it’s any wanna be mexican beer in a margarita.  But for us it’s our chili beer mixed with margaritas.  It sounds crazy, I know, and isn’t for the lighthearted.   We started this last year and it was a huge hit.  Most of our friends loved it and few hated it, but all were glad we made it.  What we didn’t know is we found the perfect way to use this beer.  We were having a bbq and a couple of our guests wanted one, but were on our last bottle.  What to do?  Well being us and our friends being as adventurous, we decided to put it in the margaritas we were making.  Kick it up a notch.  Well to say it was a hit is an understatement.  That pitcher of margaritas didn’t stand a chance!  I know it sounds weird, and it’s not the most attractive drink, but it worked and really well.  The spice and bubbles gave the margaritas  just the right amount of zing and cut the sweet enough to make it refreshing.  Now cut to a year later and bam!  We have more chili beer!!!  So when you come over to the roof top there will be a pitcher of Beer-ritas waiting for you.  For as long as they last.

But if you can’t make it over, or don’t want to make the chili beer from scratch then try adding a chopped jalapeno , that has been soaking in the juice of one lime or lemon for about 10 minutes(brings out the heat in the pepper) and one dark Mexican beer, like Negro Modelo.  This is per pitcher.   It may not be as exact as ours but you get the spice and bubbles that really make this a great summer drink.

Now if your like us and you make your margaritas from scratch, you might want adjust as needed or to your taste.

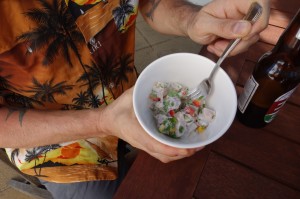
Ceviche 3 Ways

Ceviche 3 ways
Recipe type: Appetizer
Prep time: 
Cook time: 
Total time: 
Serves: 4
 
Ingredients
  • 1 lb. of fresh white fish (Tilapia, dosage Basa)
  • 2-3 juiced lemons or lime
  • half a red bell pepper
  • half a yellow or orange bell pepper
  • half a small onion (red or yellow)
  • ¼ cup chopped Cilantro
  • Version 2
  • 1 can of coconut milk.
  • Version 3
  • 1 freshly grated coconut
Instructions
  1. Make sure the fish is as fresh as you can get. It really makes a difference.
  2. Juice citrus( I prefer lime)
  3. Chop fish into small bite size pieces
  4. In a bowl add fish and juice
  5. Cover with plastic wrap or put in a zip lock bag, healing
  6. Chill in fridge for at least and hour or more. The longer the better.
  7. Chop onion and peppers into small pieces, set aside
  8. Chop up cilantro and set aside
  9. When fish is done combine with veggies, cilantro in serving bowl
  10. Serve immediately
  11. *Version 2
  12. When fish is done rinse in a colander and put in serving bowl
  13. Add veggies and cilantro
  14. Add coconut milk, stir and serve.
  15. *Version 3
  16. When fish is done rinse in a colander and put in serving bowl
  17. Add veggies and cilantro
  18. Grate coconut and use a piece of cheesecloth to squeeze out the milk
  19. Add coconut milk to fish and veggies
  20. Serve immediately
Notes
The measurements are approximate. Make sure there is enough liquid(juice) to cook the fish. I like to use a zip lock bag so the juice gets everywhere, and put it on a flat surface in the fridge. Halfway through the marinating process turn the bag over or if using a bowl, stir it at least once. Also when we were in Fiji the chef told us that when they don't have citrus they use white wine vinegar. We haven't tried it but if your going to, rinse the fish off after and use coconut milk.


Coconut Ceviche

Spring is here, although it took a while, we are seeing the signs everywhere.  People are out and about.  Eating on the sidewalks, lounging in parks, riding bikes and doing anything they can to be out in the world.  We here at Houseofzeta.com have been prepping in our own way. We have made a few batches of beer over winter,  collected some recipes to try out and put the up the BBQ.  We made our annual trek to D.C. for the Blossom festival, planted new flowers, signed up for the bike share and put away our winter clothes.  It is time to start fresh and get ready for summer!!!  Here is a quick easy recipe, that we have made many times and is a staple at our rooftop bbq’s, but now with a South Island twist that we learned when we were in Auckland and Fiji.  So enjoy and make it all summer!  Your guest will love it and never get tired of it!

Fish Two Ways

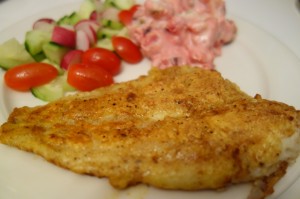
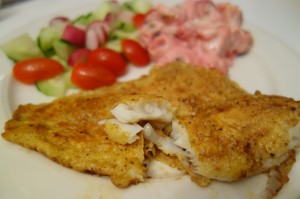
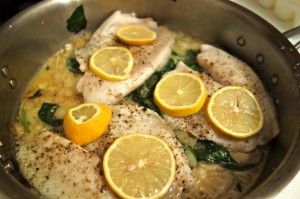
friedfish1 friedfish2tilapia_spinich_lemon_pan tilapia_spinich_lemon_plate


As a quick post I thought I’d give you my tips for two easy ways to cook fish.  The first is a Tilapia.  A great fish that is not too fussy.  I like to make tacos with it but today we are going to steam it over spinach.  All you need is the fish, unhealthy spinach, a lemon, a garlic cove or two, olive oil and salt and pepper.  Simply pat fish the dry, salt and pepper it and set aside.  Next slice a lemon into rings, set aside.  Simple so far, right?  We are almost finished.  Grab your spinach that you have rinsed if you bought in a bundle or if you bought a bag simply open it.  Next saute it in a little olive oil and one or two chopped cloves of garlic.  Salt and pepper to taste.  Once the spinach has wilted lay the Tilapia on top then add the lemon slices on the fish, lower your heat, cover it and let sit till fish is opaque in the center, about 8-10 minutes depending on size.  Serve with whatever you like.  I usually have asparagus and some potato or a salad depending on my mood.

The second one is Flounder. Another white fish that is easy to tackle.  I usually use Tilapia for this but I recently went to the store and they were out, so I grabbed a flounder instead and it worked out perfectly.  This time we used flour, butter, egg and seasoning.  Very simple.  I usually don’t use egg with this recipe but since I never cooked Flounder it seamed as I was preparing it I should use an egg to help with the breading.    Normally what I do is salt and pepper the flower, dredge the fish in it dry and fry it up butter.  But, today we are going to do and extra step or two.  First salt, pepper and season the flour, I used some smoked paprika.  Next I beat one egg and set that aside.  Then take the fish and dredge it in the flower.  This is where I would normally put it the pan and cook it.  But I wanted a thicker crust so I the put it through the egg wash and re drudged it through  the flower.  I then put it in the frying pan with the melted butter and cooked it for 3-4 minutes on each side, till golden brown  and it had a nice flaky crust.  Now your probably asking how much butter?  Well, I leave that up to you……………..Along with whatever sides you like.  Enjoy!!!

« Older posts Newer posts »

© 2025 House of Zeta

Theme by Anders NorenUp ↑